本文共 17088 字,大约阅读时间需要 56 分钟。
转载请注明:http://blog.csdn.net/ict2014/article/details/17394259
SkipList在leveldb以及lucence中都广为使用,是比较高效的数据结构。由于它的代码以及原理实现的简单性,更为人们所接受。我们首先看看SkipList的定义,为什么叫跳跃表?
“ Skip lists are data structures that use probabilistic balancing rather than strictly enforced balancing. As a result, the algorithms for insertion and deletion in skip lists are much simpler and significantly faster than equivalent algorithms for balanced trees. ”
译文:跳跃表使用概率均衡技术而不是使用强制性均衡,因此,对于插入和删除结点比传统上的平衡树算法更为简洁高效。
我们看一个图就能明白,什么是跳跃表,如图1所示:

图1:跳跃表简单示例
如上图所示,是一个即为简单的跳跃表。传统意义的单链表是一个线性结构,向有序的链表中插入一个节点需要O(n)的时间,查找操作需要O(n)的时间。如果我们使用图1所示的跳跃表,就可以减少查找所需时间为O(n/2),因为我们可以先通过每个节点的最上面的指针先进行查找,这样子就能跳过一半的节点。比如我们想查找19,首先和6比较,大于6之后,在和9进行比较,然后在和12进行比较......最后比较到21的时候,发现21大于19,说明查找的点在17和21之间,从这个过程中,我们可以看出,查找的时候跳过了3、7、12等点,因此查找的复杂度为O(n/2)。查找的过程如下图2:

图2:跳跃表查找操作简单示例
其实,上面基本上就是跳跃表的思想,每一个结点不单单只包含指向下一个结点的指针,可能包含很多个指向后续结点的指针,这样就可以跳过一些不必要的结点,从而加快查找、删除等操作。对于一个链表内每一个结点包含多少个指向后续元素的指针,这个过程是通过一个随机函数生成器得到,这样子就构成了一个跳跃表。这就是为什么论文“Skip Lists : A Probabilistic Alternative to Balanced Trees ”中有“概率”的原因了,就是通过随机生成一个结点中指向后续结点的指针数目。随机生成的跳跃表可能如下图3所示:

图3:随机生成的跳跃表
跳跃表的大体原理,我们就讲述到这里。下面我们将从如下几个方面来探讨跳跃表的操作:
1、重要数据结构定义
2、初始化表
3、查找
4、插入
5、删除
6、随机数生成器
7、释放表
8、性能比较
(一)重要数据结构定义
从图3中,我们可以看出一个跳跃表是由结点组成,结点之间通过指针进行链接。因此我们定义如下数据结构:
//定义key和value的类型typedef int KeyType;typedef int ValueType; //定义结点typedef struct nodeStructure* Node;struct nodeStructure{ KeyType key; ValueType value; Node forward[1];}; //定义跳跃表typedef struct listStructure* List;struct listStructure{ int level; Node header;}; 每一个结点都由3部分组成,key(关键字)、value(存放的值)以及forward数组(指向后续结点的数组,这里只保存了首地址)。通过这些结点,我们就可以创建跳跃表List,它是由两个元素构成,首结点以及level(当前跳跃表内最大的层数或者高度)。这样子,基本的数据结构定义完毕了。 (二)初始化表
初始化表主要包括两个方面,首先就是header节点和NIL结点的申请,其次就是List资源的申请。
void SkipList::NewList(){ //设置NIL结点 NewNodeWithLevel(0, NIL_); NIL_->key = 0x7fffffff; //设置链表List list_ = (List)malloc(sizeof(listStructure)); list_->level = 0; //设置头结点 NewNodeWithLevel(MAX_LEVEL,list_->header); for(int i = 0; i < MAX_LEVEL; ++i){ list_->header->forward[i] = NIL_; } //设置链表元素的数目 size_ = 0;} void SkipList::NewNodeWithLevel(const int& level, Node& node){ //新结点空间大小 int total_size = sizeof(nodeStructure) + level*sizeof(Node); //申请空间 node = (Node)malloc(total_size); assert(node != NULL);} 其中,NewNodeWithLevel是申请结点(总共level层)所需的内存空间。NIL_节点会在后续全部代码实现中可以看到。 (三)查找
查找就是给定一个key,查找这个key是否出现在跳跃表中,如果出现,则返回其值,如果不存在,则返回不存在。我们结合一个图就是讲解查找操作,如下图4所示:

图4:查找操作前的跳跃表
如果我们想查找19是否存在?如何查找呢?我们从头结点开始,首先和9进行判断,此时大于9,然后和21进行判断,小于21,此时这个值肯定在9结点和21结点之间,此时,我们和17进行判断,大于17,然后和21进行判断,小于21,此时肯定在17结点和21结点之间,此时和19进行判断,找到了。具体的示意图如图5所示:

图5:查找操作后的跳跃表
bool SkipList::Search(const KeyType& key, ValueType& value){ Node x = list_->header; int i; for(i = list_->level; i >= 0; --i){ while(x->forward[i]->key < key){ x = x->forward[i]; } } x = x->forward[0]; if(x->key == key){ value = x->value; return true; }else{ return false; }} (四)插入
插入包含如下几个操作:1、查找到需要插入的位置 2、申请新的结点 3、调整指针。我们结合下图6进行讲解,查找如下图的灰色的线所示 申请新的结点如17结点所示, 调整指向新结点17的指针以及17结点指向后续结点的指针。这里有一个小技巧,就是使用update数组保存大于17结点的位置,这样如果插入17结点的话,就指针调整update数组和17结点的指针、17结点和update数组指向的结点的指针。update数组的内容如红线所示,这些位置才是有可能更新指针的位置。
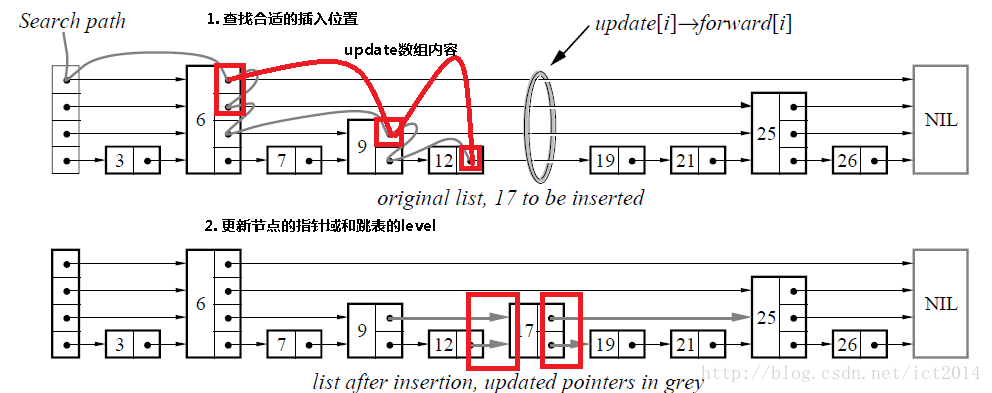
图6:插入操作示意图(感谢博主:来自cnblogs的qiang.xu )
bool SkipList::Insert(const KeyType& key, const ValueType& value){ Node update[MAX_LEVEL]; int i; Node x = list_->header; //寻找key所要插入的位置 //保存大于key的位置信息 for(i = list_->level; i >= 0; --i){ while(x->forward[i]->key < key){ x = x->forward[i]; } update[i] = x; } x = x->forward[0]; //如果key已经存在 if(x->key == key){ x->value = value; return false; }else{ //随机生成新结点的层数 int level = RandomLevel(); //为了节省空间,采用比当前最大层数加1的策略 if(level > list_->level){ level = ++list_->level; update[level] = list_->header; } //申请新的结点 Node newNode; NewNodeWithLevel(level, newNode); newNode->key = key; newNode->value = value; //调整forward指针 for(int i = level; i >= 0; --i){ x = update[i]; newNode->forward[i] = x->forward[i]; x->forward[i] = newNode; } //更新元素数目 ++size_; return true; }}
(五)删除
删除操作类似于插入操作,包含如下3步:1、查找到需要删除的结点 2、删除结点 3、调整指针
bool SkipList::Delete(const KeyType& key, ValueType& value){ Node update[MAX_LEVEL]; int i; Node x = list_->header; //寻找要删除的结点 for(i = list_->level; i >= 0; --i){ while(x->forward[i]->key < key){ x = x->forward[i]; } update[i] = x; } x = x->forward[0]; //结点不存在 if(x->key != key){ return false; }else{ value = x->value; //调整指针 for(i = 0; i <= list_->level; ++i){ if(update[i]->forward[i] != x) break; update[i]->forward[i] = x->forward[i]; } //删除结点 free(x); //更新level的值,有可能会变化,造成空间的浪费 while(list_->level > 0 && list_->header->forward[list_->level] == NIL_){ --list_->level; } //更新链表元素数目 --size_; return true; }} (六)随机数生成器
再向跳跃表中插入新的结点时候,我们需要生成该结点的层数,使用的就是随机数生成器,随机的生成一个层数。这部分严格意义上讲,不属于跳跃表的一部分。随机数生成器说简单很简单,说难很也很难,看你究竟是否想生成随机的数。可以采用c语言中srand以及rand函数,也可以自己设计随机数生成器。此部分我们采用levelDB随机数生成器:
// Copyright (c) 2011 The LevelDB Authors. All rights reserved.// Use of this source code is governed by a BSD-style license that can be// found in the LICENSE file. See the AUTHORS file for names of contributors. #include//typedef unsigned int uint32_t;//typedef unsigned long long uint64_t; // A very simple random number generator. Not especially good at// generating truly random bits, but good enough for our needs in this// package.class Random { private: uint32_t seed_; public: explicit Random(uint32_t s) : seed_(s & 0x7fffffffu) { // Avoid bad seeds. if (seed_ == 0 || seed_ == 2147483647L) { seed_ = 1; } } uint32_t Next() { static const uint32_t M = 2147483647L; // 2^31-1 static const uint64_t A = 16807; // bits 14, 8, 7, 5, 2, 1, 0 // We are computing // seed_ = (seed_ * A) % M, where M = 2^31-1 // // seed_ must not be zero or M, or else all subsequent computed values // will be zero or M respectively. For all other values, seed_ will end // up cycling through every number in [1,M-1] uint64_t product = seed_ * A; // Compute (product % M) using the fact that ((x << 31) % M) == x. seed_ = static_cast ((product >> 31) + (product & M)); // The first reduction may overflow by 1 bit, so we may need to // repeat. mod == M is not possible; using > allows the faster // sign-bit-based test. if (seed_ > M) { seed_ -= M; } return seed_; } // Returns a uniformly distributed value in the range [0..n-1] // REQUIRES: n > 0 uint32_t Uniform(int n) { return (Next() % n); } // Randomly returns true ~"1/n" of the time, and false otherwise. // REQUIRES: n > 0 bool OneIn(int n) { return (Next() % n) == 0; } // Skewed: pick "base" uniformly from range [0,max_log] and then // return "base" random bits. The effect is to pick a number in the // range [0,2^max_log-1] with exponential bias towards smaller numbers. uint32_t Skewed(int max_log) { return Uniform(1 << Uniform(max_log + 1)); }};
其中核心的是 seed_ = (seed_ * A) % M这个函数,并且调用一次就重新更新一个种子seed。以达到随机性。
根据个人喜好,自己可以独立设计随机数生成器,只要能够返回一个随机的数字即可。(七)释放表
释放表的操作比较简单,只要像单链表一样释放表就可以,释放表的示意图8如下:

图8:释放表
void SkipList::FreeList(){ Node p = list_->header; Node q; while(p != NIL_){ q = p->forward[0]; free(p); p = q; } free(p); free(list_);} (八)性能比较
我们对跳跃表、平衡树等进行比较,如下图9所示: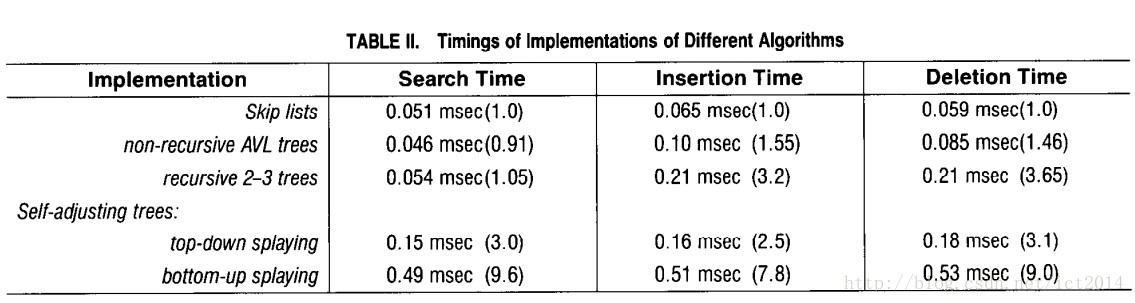
图9:性能比较图
从中可以看出,随机跳跃表表现性能很不错,节省了大量复杂的调节平衡树的代码。
========自己开发的源代码,部分参照qiang.xu====================
下面我将自己用C++实现的代码贴出来,总共包含了如下几个文件:
1、Main.cpp 主要用于测试SkipList
2、skiplist.h 接口声明以及重要数据结构定义
3、skiplist.cpp 接口的具体实现
4、random.h 随机数生成器
--------------------------------------Main.cpp----------------------------------------------------
//此文件用于测试skiplist////@作者:张海波//@时间:2013-12-17//@版权:个人所有 #include "skiplist.h"#includeusing namespace std; int main(int argc, char** argv){ cout << "test is starting ....." << endl; SkipList list; //测试插入 for(int i = 0; i < 100; ++i){ list.Insert(i, i+10); //cout << list.GetCurrentLevel() << endl; } cout << "The number of elements in SkipList is :" << list.size() << endl; if(list.size() != 100){ cout << "Insert failure." << endl; }else{ cout << "Insert success." << endl; } //测试查找 bool is_search_success = true; for(int i = 0; i < 100; ++i){ int value; if(!(list.Search(i,value) && (value == i+10))){ is_search_success = false; break; } } if(is_search_success){ cout << "Search success." << endl; }else{ cout << "Search failure." << endl; } //测试删除 bool is_delete_success = true; for(int i = 0; i < 100; ++i){ int value; if(!(list.Delete(i,value) && (value == i+10))){ is_delete_success = false; break; } } if(is_delete_success){ cout << "Delete success." << endl; }else{ cout << "Delete failure." << endl; } cout << "test is finished ...." << endl; return 0;}
--------------------------------------------------skiplist.h---------------------------------------------------
//跳表实现////参考文章为:Skip lists: a probabilistic alternative to balanced trees////提供如下接口:// Search:搜索给定key的值// Insert:插入指定的key及value// Delete:删除指定的key////@作者: 张海波//@时间: 2013-12-17//@版权: 个人所有// #include#include "random.h" //定义调试开关#define Debug //最大层数const int MAX_LEVEL = 16; //定义key和value的类型typedef int KeyType;typedef int ValueType; //定义结点typedef struct nodeStructure* Node;struct nodeStructure{ KeyType key; ValueType value; Node forward[1];}; //定义跳跃表typedef struct listStructure* List;struct listStructure{ int level; Node header;}; class SkipList{public: //初始化表结构 SkipList():rnd_(0xdeadbeef) { NewList(); } //释放内存空间 ~SkipList(){ FreeList(); } //搜索key,保存结果至value //找到,返回true //未找到,返回false bool Search(const KeyType& key, ValueType& value); //插入key和value bool Insert(const KeyType& key, const ValueType& value); //删除key,保存结果至value //删除成功返回true //未删除成功返回false bool Delete(const KeyType& key, ValueType& value); //链表包含元素的数目 int size(){ return size_; } //打印当前最大的level int GetCurrentLevel();private: //初始化表 void NewList(); //释放表 void FreeList(); //创建一个新的结点,结点的层数为level void NewNodeWithLevel(const int& level, Node& node); //随机生成一个level int RandomLevel();private: List list_; Node NIL_; //链表中包含元素的数目 size_t size_; //随机器生成器 Random rnd_;};
-------------------------------------------------------------skiplist.cpp-----------------------------------------------------
//skiplist头文件重要函数实现////@作者:张海波//@时间:2013-12-17//@版权:个人所有 #include "skiplist.h"#include "time.h"#include#include #include #include using namespace std; void DebugOutput(const string& information){#ifdef Debug cout << information << endl;#endif} void SkipList::NewList(){ //设置NIL结点 NewNodeWithLevel(0, NIL_); NIL_->key = 0x7fffffff; //设置链表List list_ = (List)malloc(sizeof(listStructure)); list_->level = 0; //设置头结点 NewNodeWithLevel(MAX_LEVEL,list_->header); for(int i = 0; i < MAX_LEVEL; ++i){ list_->header->forward[i] = NIL_; } //设置链表元素的数目 size_ = 0;} void SkipList::NewNodeWithLevel(const int& level, Node& node){ //新结点空间大小 int total_size = sizeof(nodeStructure) + level*sizeof(Node); //申请空间 node = (Node)malloc(total_size); assert(node != NULL);} void SkipList::FreeList(){ Node p = list_->header; Node q; while(p != NIL_){ q = p->forward[0]; free(p); p = q; } free(p); free(list_);} bool SkipList::Search(const KeyType& key, ValueType& value){ Node x = list_->header; int i; for(i = list_->level; i >= 0; --i){ while(x->forward[i]->key < key){ x = x->forward[i]; } } x = x->forward[0]; if(x->key == key){ value = x->value; return true; }else{ return false; }} bool SkipList::Insert(const KeyType& key, const ValueType& value){ Node update[MAX_LEVEL]; int i; Node x = list_->header; //寻找key所要插入的位置 //保存大约key的位置信息 for(i = list_->level; i >= 0; --i){ while(x->forward[i]->key < key){ x = x->forward[i]; } update[i] = x; } x = x->forward[0]; //如果key已经存在 if(x->key == key){ x->value = value; return false; }else{ //随机生成新结点的层数 int level = RandomLevel(); //为了节省空间,采用比当前最大层数加1的策略 if(level > list_->level){ level = ++list_->level; update[level] = list_->header; } //申请新的结点 Node newNode; NewNodeWithLevel(level, newNode); newNode->key = key; newNode->value = value; //调整forward指针 for(int i = level; i >= 0; --i){ x = update[i]; newNode->forward[i] = x->forward[i]; x->forward[i] = newNode; } //更新元素数目 ++size_; return true; }} bool SkipList::Delete(const KeyType& key, ValueType& value){ Node update[MAX_LEVEL]; int i; Node x = list_->header; //寻找要删除的结点 for(i = list_->level; i >= 0; --i){ while(x->forward[i]->key < key){ x = x->forward[i]; } update[i] = x; } x = x->forward[0]; //结点不存在 if(x->key != key){ return false; }else{ value = x->value; //调整指针 for(i = 0; i <= list_->level; ++i){ if(update[i]->forward[i] != x) break; update[i]->forward[i] = x->forward[i]; } //删除结点 free(x); //更新level的值,有可能会变化,造成空间的浪费 while(list_->level > 0 && list_->header->forward[list_->level] == NIL_){ --list_->level; } //更新链表元素数目 --size_; return true; }} int SkipList::RandomLevel(){ int level = static_cast (rnd_.Uniform(MAX_LEVEL)); if(level == 0){ level = 1; } //cout << level << endl; return level;} int SkipList::GetCurrentLevel(){ return list_->level;}
-----------------------------------------------------------random.h-------------------------------------------------------
// Copyright (c) 2011 The LevelDB Authors. All rights reserved.// Use of this source code is governed by a BSD-style license that can be// found in the LICENSE file. See the AUTHORS file for names of contributors. #include//typedef unsigned int uint32_t;//typedef unsigned long long uint64_t; // A very simple random number generator. Not especially good at// generating truly random bits, but good enough for our needs in this// package.class Random { private: uint32_t seed_; public: explicit Random(uint32_t s) : seed_(s & 0x7fffffffu) { // Avoid bad seeds. if (seed_ == 0 || seed_ == 2147483647L) { seed_ = 1; } } uint32_t Next() { static const uint32_t M = 2147483647L; // 2^31-1 static const uint64_t A = 16807; // bits 14, 8, 7, 5, 2, 1, 0 // We are computing // seed_ = (seed_ * A) % M, where M = 2^31-1 // // seed_ must not be zero or M, or else all subsequent computed values // will be zero or M respectively. For all other values, seed_ will end // up cycling through every number in [1,M-1] uint64_t product = seed_ * A; // Compute (product % M) using the fact that ((x << 31) % M) == x. seed_ = static_cast ((product >> 31) + (product & M)); // The first reduction may overflow by 1 bit, so we may need to // repeat. mod == M is not possible; using > allows the faster // sign-bit-based test. if (seed_ > M) { seed_ -= M; } return seed_; } // Returns a uniformly distributed value in the range [0..n-1] // REQUIRES: n > 0 uint32_t Uniform(int n) { return (Next() % n); } // Randomly returns true ~"1/n" of the time, and false otherwise. // REQUIRES: n > 0 bool OneIn(int n) { return (Next() % n) == 0; } // Skewed: pick "base" uniformly from range [0,max_log] and then // return "base" random bits. The effect is to pick a number in the // range [0,2^max_log-1] with exponential bias towards smaller numbers. uint32_t Skewed(int max_log) { return Uniform(1 << Uniform(max_log + 1)); }};
上述程序运行的结果如下图所示:
————————————————
版权声明:本文为CSDN博主「战辉」的原创文章,遵循CC 4.0 BY-SA版权协议,转载请附上原文出处链接及本声明。 原文链接:https://blog.csdn.net/ict2014/article/details/17394259